
Q1. Identify users who increased their average order value consistently over the last 3 months.
CREATE TABLE zomato_orders ( order_id     NUMBER PRIMARY KEY
                         ,   user_id      NUMBER
                         ,   order_value  NUMBER
                         ,   order_date   DATE );

BEGIN
  INSERT INTO zomato_orders VALUES (1, 101, 200, TO_DATE('2024-04-15', 'YYYY-MM-DD'));
  INSERT INTO zomato_orders VALUES (2, 101, 220, TO_DATE('2024-05-10', 'YYYY-MM-DD'));
  INSERT INTO zomato_orders VALUES (3, 101, 240, TO_DATE('2024-06-05', 'YYYY-MM-DD'));
  INSERT INTO zomato_orders VALUES (4, 102, 500, TO_DATE('2024-04-20', 'YYYY-MM-DD'));
  INSERT INTO zomato_orders VALUES (5, 102, 300, TO_DATE('2024-05-11', 'YYYY-MM-DD'));
  INSERT INTO zomato_orders VALUES (6, 102, 600, TO_DATE('2024-06-08', 'YYYY-MM-DD'));
  INSERT INTO zomato_orders VALUES (7, 103, 300, TO_DATE('2024-04-10', 'YYYY-MM-DD'));
  INSERT INTO zomato_orders VALUES (8, 103, 400, TO_DATE('2024-05-15', 'YYYY-MM-DD'));
  INSERT INTO Zomato_Orders VALUES (9, 103, 350, TO_DATE('2024-06-01', 'YYYY-MM-DD'));
  INSERT INTO zomato_orders VALUES (10, 101, 220, TO_DATE('2024-05-10', 'YYYY-MM-DD'));
END;
/
Watch the below youtube video for full explaination
How to achieve this?
1. Calculate monthly average order value.
2. Use LAG() / LEAD() to compare month-over-month averages.
3. Filter only users with consistently increasing averages.
1. Calculate Monthly Average Order Value per User
Group orders by user and month to calculate the average order value.
SELECT  user_id
     ,  TO_CHAR(order_date, 'YYYY-MM') as order_month
     ,  AVG(order_value) as avg_order_value
FROM Zomato_Orders
-- WHERE order_date >= ADD_MONTHS(TRUNC(SYSDATE), -3) [If using live data use this condition]
GROUP BY user_id
      , TO_CHAR(order_date, 'YYYY-MM') ;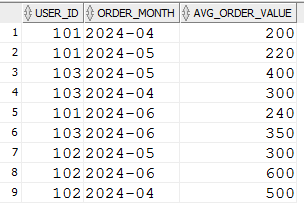
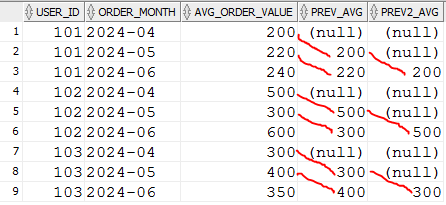
2. Compare Month-Over-Month Averages Using LAG()
Now, with the above derived table we are using LAG() to compare month-over-month averages.
SELECT user_id
        ,     order_month
        ,     avg_order_value
        ,     LAG(avg_order_value, 1) OVER (PARTITION BY user_id ORDER BY order_month) as prev_avg
        ,     LAG(avg_order_value, 2) OVER (PARTITION BY user_id ORDER BY order_month) as prev2_avg
       FROM (  SELECT  user_id
                   ,  TO_CHAR(order_date, 'YYYY-MM') as order_month
                   ,  AVG(order_value) as avg_order_value
               FROM Zomato_Orders
               -- WHERE order_date >= ADD_MONTHS(TRUNC(SYSDATE), -3)
               GROUP BY user_id
                      , TO_CHAR(order_date, 'YYYY-MM')
            )
3. In this we need to filter out not null data’s
SELECT  user_id
     ,  Order_Month
     ,  Avg_Order_Value
     ,  Prev_Avg
     ,  prev2_avg
FROM ( SELECT user_id
        ,     order_month
        ,     avg_order_value
        ,     LAG(avg_order_value, 1) OVER (PARTITION BY user_id ORDER BY order_month) as prev_avg
        ,     LAG(avg_order_value, 2) OVER (PARTITION BY user_id ORDER BY order_month) as prev2_avg
       FROM (  SELECT  user_id
                   ,  TO_CHAR(order_date, 'YYYY-MM') as order_month
                   ,  AVG(order_value) as avg_order_value
               FROM Zomato_Orders
               -- WHERE order_date >= ADD_MONTHS(TRUNC(SYSDATE), -3)
               GROUP BY user_id
                      , TO_CHAR(order_date, 'YYYY-MM')
            )
     )
WHERE prev_avg IS NOT NULL and prev2_avg IS NOT NULL
4. Filter Users with Consistently Increasing Averages
Finally, we need to compare and select only users where each month’s average is greater than the previous one for 3 consecutive months. And below is the final query
SELECT DISTINCT user_id
FROM ( SELECT user_id
        ,     order_month
        ,     avg_order_value
        ,     LAG(avg_order_value, 1) OVER (PARTITION BY user_id ORDER BY order_month) as prev_avg
        ,     LAG(avg_order_value, 2) OVER (PARTITION BY user_id ORDER BY order_month) as prev2_avg
       FROM (  SELECT  user_id
                   ,  TO_CHAR(order_date, 'YYYY-MM') as order_month
                   ,  AVG(order_value) as avg_order_value
               FROM Zomato_Orders
               -- WHERE order_date >= ADD_MONTHS(TRUNC(SYSDATE), -3)
               GROUP BY user_id
                      , TO_CHAR(order_date, 'YYYY-MM')
            )
     )
WHERE prev_avg IS NOT NULL and prev2_avg IS NOT NULL
AND prev2_avg <= prev_avg and prev_avg < avg_order_value;